Before delving into Das Keyboard I’d like to take the opportunity to show you the trailer video of the Ultimate Hacking Keyboard, a high-end mechanical keyboard of which I’m the lead developer. Our keyboard is going to be kickstarted soon so you’re more than welcome to share it, follow us and subscribe to our list to get notified when our campaign starts. See you on UltimateHackingKeyboard.com! Cheers!
And now on to Das Keyboard…
I felt the need to disassemble Das Keyboard and see what makes it tick. Just to make things clear, I think that Das Keyboard is the best traditional PC keyboard ever created, but not the best keyboard that is possible to create because the standard PC layout requires too much travel distance for various keys and it’s suboptimal from the typewriter’s perspective. No, I don’t mean DVORAK, but something that I could call QWERTY Compact that is very easy to learn. But that’s the topic of another post.
First of all, I want to apologize for some of the crappy pictures. My friend, Dömi and I did everything we could do to make reasonably good pictures but the lighting was less than optimal and we’re pretty unexperienced at making such photos. Anyways, let’s see what we have!
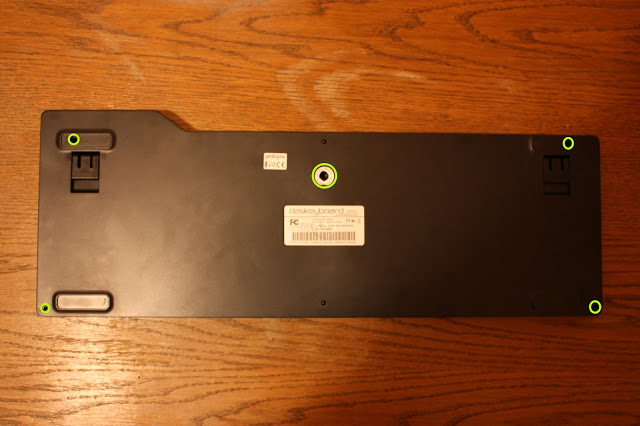
This is the back of the keyboard clearly showing where the screw holes are. You have to harm the central warranty label so say bye-bye to the guarantee if you proceed further. You also have to remove the upper rubber feet to access the screws, but you’ll be able to easily glue them back later.
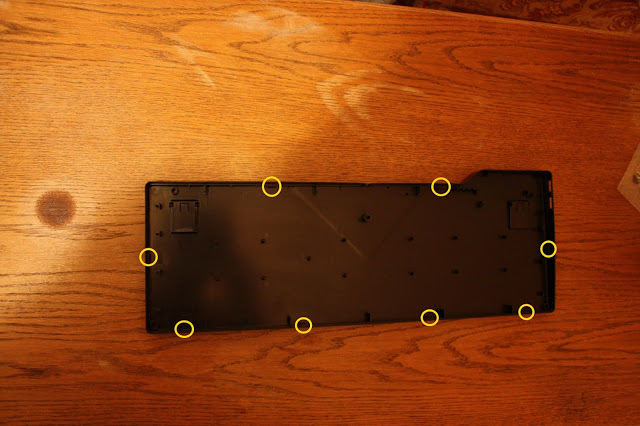
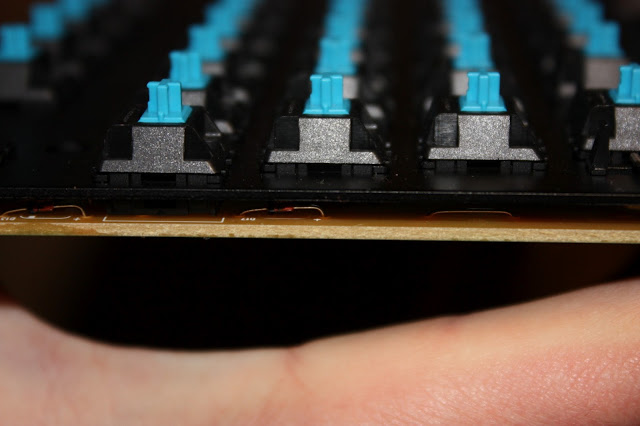
Now comes the tricker part. There are some hooks that hold together the front part and the back part of the keyboard. It looks like this:
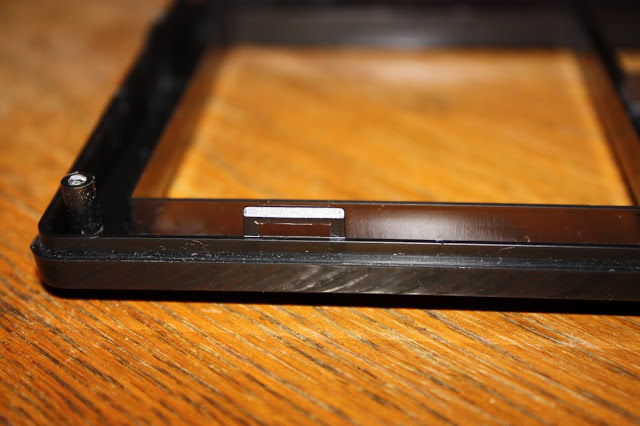
I think it’s probably impossible to disassemble the keyboard without breaking some of these hooks, but you don’t really have to worry because the screws alone will hold the front part and the back part pretty tightly so you’ll be perfectly able to use your beloved Das Keyboard after assembling it. You have to pressure the hooks from the sides with some handy tool to disassemble the front and the back parts.
Now let’s see what’s inside!
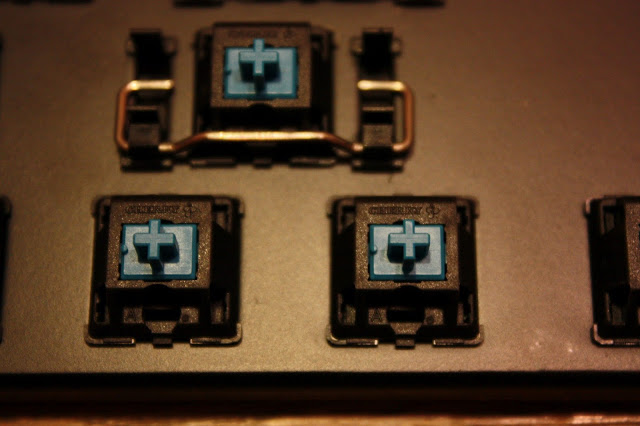
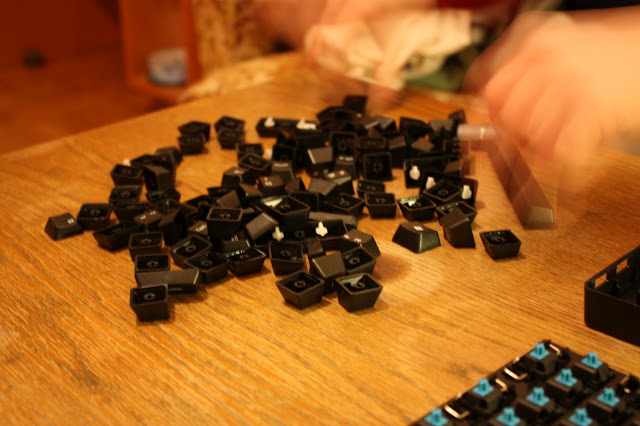
After removing the keycaps (which is a pretty easy job) you can see the soul of Das, the Cherry MX tactile keyswitches. They are both extremely durable and extremely enjoyable to type on. I’d like to note that it’s a misbelief of some people that different pressure sensitivity is required for various switches, namely that less force is needed to press a switch as the distance from the center gets longer. Every key needs constant pressure, about 50g. I’ve measured the constant pressing force by placing some coins on different keycaps.

We have lots of those switches, this obviously does not make Das a cheap keyboard. The switches are panel mounted, not PCB mounted. Panel mounting is a more robust solution than PCB mounting. Panel mounting also make Das more expensive, so think about what does this keyboard provide for its price before saying that it costs too much.
The keycaps are not ordinary either. When seeing Das from its side it’s easy to notice that the top of the keys form a slight U shape. This shape is more optimal for typewriters than the much more common linear shape used by the rest of the keyboards (not counting the Model M and Unicomp keyboards). Because of this shape, each row has to close a different angle with the base panel than the other rows.
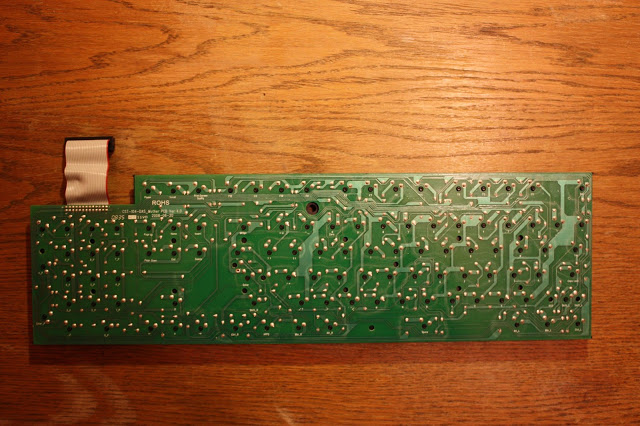
The keys are attached to the PCB (but they sit on the aluminium panel shown above). Most dome switch keyboards use foil, but we’re not dealing with mediocre quality here.
Das uses diodes to implement N-key rollover. Let me note that it doesn’t implement true N-key rollover, only 10-key rollover, but it’s hardly a limitation as most of us have 10 fingers.
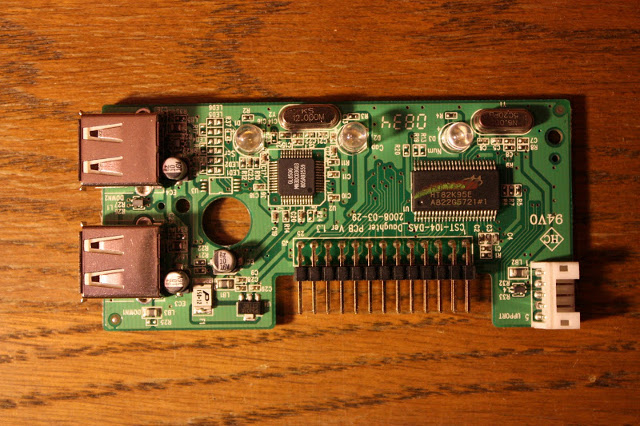
The controller PCB is definitely not an ordinary one. The left IC is a Genesys GL850G USB hub controller and the right baby is a Holtek HT82K95E USB Multimedia Keyboard Encoder 8-Bit MCU.
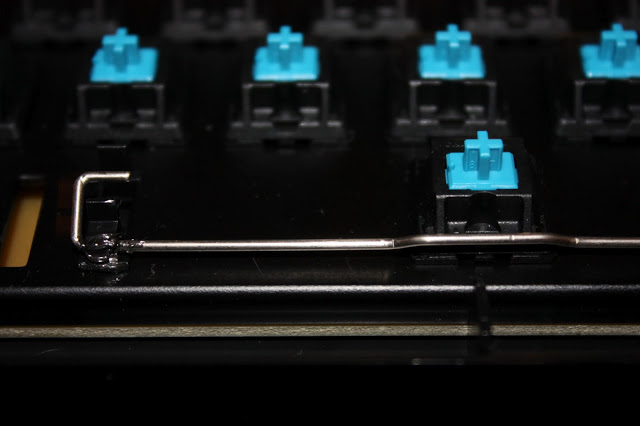
After using Das for some weeks I could hear some squeaky noise when pressing the space bar. I was more than surprised because everything else was so terrific about the keyboard. After I applied some lubricating grease to it the irritating voice gone away. Some grease should be applied to these wires during the manufacturing process. Apart from that I cannot say any bad things about Das.
You probably pretty much know my opinion about Das after reading this post, but let me say a word of wisdom at the end. You can buy many crappy keyboards throughout your life or one real keyboard. The choice is yours. You know which I opt for.
You can check out higher resolution photos in a separate Google+ album.
Thanks for Werner Heuser for linking this post on Repair4Keyboard.com.
Have the same problem: pressing the space bar produces a squeaking.
Hum, that for I’d need to break the guarantee, correct? That’s no option for me :-(
You do not have to disassemble the keyboard in order to apply the grease. You just remove the space keycap, apply the grease and put the keycap back.
Hi,
I’ve been using Das Keyboard III for 6 months and can say that it’s the best keyboard I’ve ever used. But several days ago, it was spilled with some clean water… :( And now it doesn’t work. Do you know, how can it be repaired? All keys are ok, but the controller PCB doesn’t work properly: when I plug it to computer, all 3 LEDs turn on lighting and there’s no reaction on pressing any key. So, do you know the exact name of this controller (to find it at Google)? or can it be replaced by some another controller? Or maybe you can tell me, where I can order it…
Thank you.
Hey Dmitry,
I’m not sure where can you have a replacement PCB from, but your retailer from which you got your Das might know so I suggest you to ask them or contact Metadot directly.
The other alternative is finding with a multimeter which SMD on the PCB got broken and order only the broken components but it can be *much* work, so it’s probably only for electronics geeks.
Hope it helps.
Laci, thank you for quick reply!
There’s no retailer here in Russia.. I’ve ordered this keyboard via Internet and “Das keyboard” support can’t help me. So, I’ll try to contact Metadot.
Thanks!
It’a amazing, but my keyboard works! There’re some glitches, but it works. So, after reboot it isn’t identified by Windows 7. I had such problem before, but USB Y-cable helped me.. now I have that issue again, and cable doesn’t help. After every restart I have to replug keyboard.
I’m happy that your Das works, Dimitry. I’ve only used Das with Ubuntu without any such problems, so don’t have any experiences with Windows 7.
Hello everyone. I just got my Das Keyboard today and I also noticed some squeaking with the space bar. I’m wondering if someone could tell me how to remove the spacebar keycap without taking the whole thing apart, and what type of lubricating grease to apply. I don’t want to mess thing thing up.
Hey Darin,
First, you have to disconnect the space bar from the underlying switch which you can do by applying a moderate upward force to the space bar by using some solid object, like a scissor.
After the space bar won’t sit on the switch you’ll notice that a metal frame still connects the space bar and the metal plate. You can easily flip the frame out from the underlying holder with the tip of the scissor.
Finally, I think you can apply pretty much any kind of grease and it should work fine. Reassembling the space bar is pretty straightforward.
László thanks for your advice on how to get this keyboard apart! I’d have made a big mess if not for you! Your notes on the positioning of the hidden clips was very helpful.
You might be interested to know that I’ve just posted a page that extends your advice by showing how to ‘hack’ the keyboards to make the left ‘Fn’ key function as a Windows/Super/Command key.
http://www.geoffbreach.com/hacks/das-keyboard-hack/
Best wishes!
Geoff
Great work, Geoff!
I was thinking about this hack myself, but you’ve made it. You’re the man!
Wow, thanks so much for writing this article! I would have never figured out there were those hooks around the edge of the keyboard.
My pleasure, Paul.
Just wanted to tell you how much I appreciate your work documenting this dis-assembly. I would surely have destroyed the case trying to pry it apart without knowledge of the clips and their placements. Thanks so much.
My pleasure, Bryson. Glad to be able to help!
Pingback: 30 Best Gadgets Disassembled
Pingback: ubuntu linux system
Could you provide a photo of and/or explain how the backplate mounted keys are connected to the PCB?
Matt: The keyswitches sit on the plate for mechanical stability and the leads of the keyswitches connect to the PCB underneath the plate. The keys themselves are sitting on the keyswitches.
I had the squeaky noise problem too. I first sprayed sewing machine oil into the cracks but I put too much in and some keys didn’t work any more. I had to remove the back of the keyboard and clean it with degreaser. After clean, it worked but noise came back. I then tried some margarine on the wires and it worked well.
Does anyone know how/if I can make the delete key less sensitive. When deleting email, it is so sensitive, it will delete 2 emails when I just press it once
Amanda: Strange. Neither of the keys should be overly sensitive. Maybe replacing the switch with another type could help. You’ll need soldering equipment and skills (or someone who has them). You can buy individual switches at http://www.wasdkeyboards.com/index.php/products/keyboard-parts-1.html
Hi Laci,
Thanks for your page, I just got my keyboard after waiting forever and within 4 day’s I spilt beer into the number pad :(,
using your advice to disassemble the key board I was able to clean it up nicely all the key still work.. My issue however is that I am using a blue cherry key board,
and the the del key and the 3 on the number pad seems to be no longer clicking like the rest. still works just bothers me.. could you suggest a solution to fix this?
I am also thinking of trying geoff’s hack I miss windows + e, etc shortcuts.
thanks again.
John
Hey John,
Glad you found my advice useful! Your problem looks like a tricky one and might be solved by disassembling the individual non-clicky switches and look inside of them to see what’s up with them. For this chances are you’ll have to desolder those switches first. If you cannot solder then maybe find someone who can or alternatively buy a soldering station and watch some soldering videos on YouTube. It’s an easy and very useful skill to have enabling you to repair stuff! If it turns out that the switches cannot be repaired then new switches can be purchased on various sites and soldered into the board.
Cheers for the fast response..
I will need to learn how to solder anyway,
I will see if I can get a few blue cherry keys to replace the ones that are damaged.
Once again thanks for your fast response.
I will let you know how it all pan’s out either way.
John,
That’s the attitude John! You can purchase switches at http://www.wasdkeyboards.com/index.php/products/keyboard-parts-1.html but if you plan to buy a couple of them for backup you better go to http://www.digikey.com/ , http://mouser.com/ or http://farnell.com/ depending on the shipping costs.
I have a DAS MX Blue keyboard on which the space keyswitch has gone bad. Hard to believe, since these keyswitches are rated at ten bazillion cycles or something. It isn’t even that old. After a period of non-use (like when I’m out of town) the space bar wouldn’t work until I exercised it a LOT. Lately it’s started going flaky after only a few hours of non-use. This is of course not acceptable. Naturally it’s just out of warranty.
Replacement keyswitches are easy to get. Having seen the inside of your board, do you think it is practical to remove and replace one keyswitch? I’m pretty good at PCB rework. The issue is this: If I have to desolder ALL of the keyswitches, in order to lift the entire switch panel off of the PCB, in order to get to whatever holds the keyswitch in place, that is not going to be happening. But if I just have to desolder the bad one, I’ll tackle it. What do you think?
Incidentally, Cherry’s patent on these keyswitches has expired, so it is possible that there are “clones” on the market that are not as good as the real thing. That could explain my flaky spacebar switch. But I wouldn’t expect the DAS makers to be that cheap.
You can definitely desolder a single switch without having to desolder all of them. Das seems to have started to use Greetech switches in some of their keyboards. I cannot blame them because Cherry has huge lead times which causes serious supply chain problems for manufacturers. I think Greetech switches are pretty excellent too but in any case can check whether you have a Cherry or a Greetech switch by checking the label on the switch.
Hi
Does anyone know if its possible to get a new usb controller for the keyboard as my usb hub has died after getting water in it due to a spillage.
Thanks
Ben
Hey Ben,
I would be surprised if they offered a replacement controller but you better ask the Das Keyboard team. Alternatively, look for a non-functional Das Keyboard with a functional controller on eBay.
Thank you very much for this post. I was able to repair my keyboard!!
Just wanted to say thanks for posting this; it helped me get my keyboard apart safely (no hooks broken!). https://flying-geek.blogspot.com/2021/04/naked-das-keyboard.html
Hii! firstly thank you for the das keyboard disassembly and analysis article! This really help me a lot!
However, there is a problem with my keyboard (which is why i want to disassemble it). After connect to the computer, it shows that it cannot be recognized.
The error code is 43 (on windows 10). I tried all the repair methods from google (reinstalling the driver, etc.) but none of them worked. Can you help me with it!! Thank you so much!
Hi there! Unfortunately, I don’t have a Das Keyboard anymore, so I can’t help you.
Still relevant 14 years later, thanks for the information!
-C9
Pingback: 30 Famous Tech Gadgets Disassembled - Hongkiat